I am working with Ricardo Cuisine today to bring you homemade candied citrus peels! This step-by-step tutorial is completely inspired by their Candied Grapefruit Peel recipe!
The holiday season is upon us and many love the homemade route. I LOVE baking cookies and giving them away. There is no greater satisfaction than homemade desserts during the holiday season and when Ricardo Cuisine contacted me, I knew immediately I would be working with a dessert!
Homemade candied citrus peels are very popular during the holidays, and as complicated as they seem, it is all an elaborate ruse. I wish I had tried these earlier because they are such a fun and creative recipe. Simple, relatively quick to make, and pure sweetness; I can see many people showing great enthusiasm over the holidays for these. The original recipe is for grapefruit peels, but I thought it would be fun to include some other fruits. The possibilities are endless, and the finishing touches are even more detailed (think sugar-crusted, chocolate dipped, or even liquored-enhanced.) And please, do not throw away the extra fruit or syrup! I have a recipe that uses both ingredients up so stay tuned for those in the next few weeks!
Let's begin the tutorial! You will need:
1 grapefruit
1 lemon
1 lime
1 orange
1 cup water (plus more for boiling stages)
2 cups granulated sugar (plus more for decorating)
1 tbsp. coconut oil (optional)
½ cup chocolate of your choice (optional)
*Please note, I am providing step-by-step photos for this candied citrus peels tutorial to better help serve you with this dessert. These candied citrus peels are inspired by Ricardo's Candied Grapefruit Peel recipe and their detailed instructions can be found here.
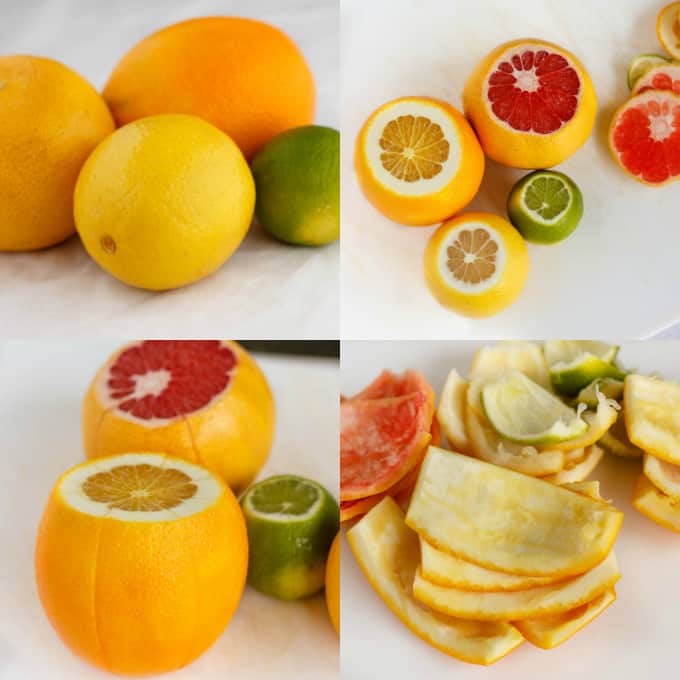
- Pick relatively attractive fruit (some bruising or marks are fine, but if you are handing these out as gifts you probably want them to look pretty!) Wash the fruit really well. Dry thoroughly and move to cutting board.
- Slice enough off each end of fruit so you can see the inner color (about ¼-1/2 inch.)
- Slice around the fruit, lengthwise, until you just reach the end of the pith (right next to the inside flesh.) You can do this as many times as you want, but 4-6 slices should be good.
- Remove the skin by prying from fruit. If you are having some trouble, use a paring knife to help separate the flesh and skin (I had to do that for the more difficult fruit such as the limes and lemons.) Use a spoon to scrape the excess fruit off the skin (leaving the white part is okay because we are cooking it enough to get rid of most of the bitterness.)
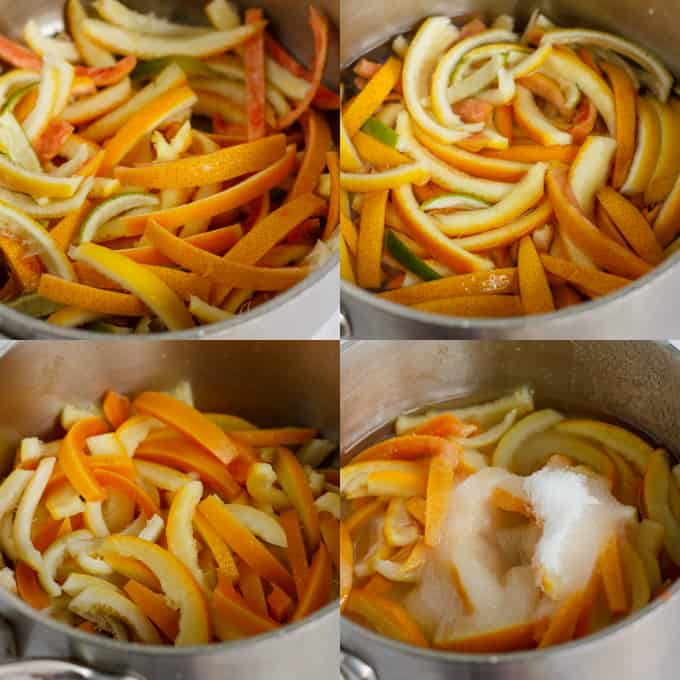
 Slice the pieces into desired thickness (I want to say my thickness was between ¼ and ½ inch.) Place into a small saucepan.
- Fill pot with cold water until peels are just submerged. Place over high heat and bring to a rapid boil. Drain and repeat two times.
- Fill with cold water one more time and this time bring to a boil and simmer, over medium heat, for 15 minutes, uncovered. Drain.
- Add the 1 cup of water and 2 cups sugar to the pot and bring to a boil again. Lower heat to a simmer over medium-low heat and allow to cook for 1 hour.
 Here on the right you can see how thick the syrup has gotten after cooking for 1 hour! That is exactly what you want! On the left, well, this was an error! I accidentally added two cups water and 1 cup sugar!! That's alright, no harm was done. I just drained the pot and added the correct amounts 🙂
- Line a baking sheet with parchment paper for easy clean up. Add a wire rack on top and carefully place the boiled peels onto it. Don't throw away that excess syrup!! Store in the fridge for later use. Allow the peels to sit overnight (you are looking for a good 24 hours of not touching these!)
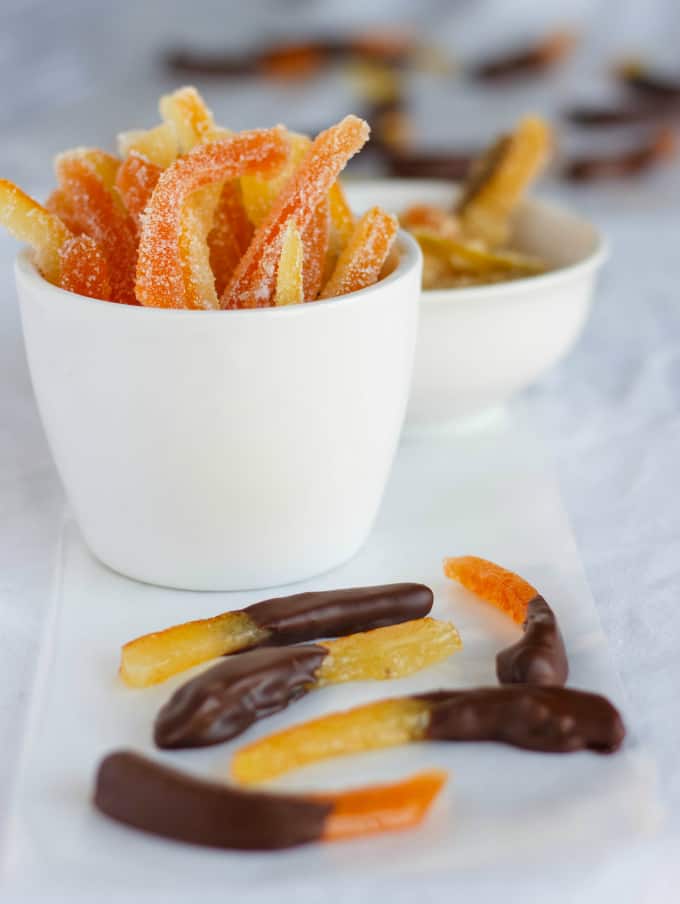
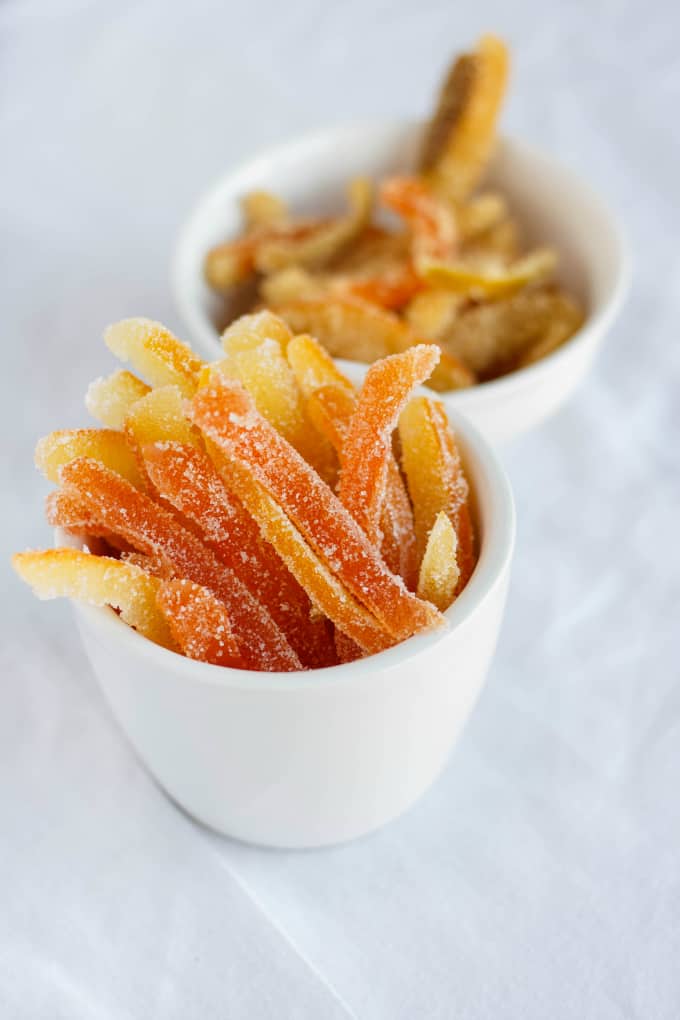
- When it is time, add some granulated sugar to a shallow bowl. Add some peels a couple at a time and roll in the sugar. Repeat until no fruit remains. You can also use brown sugar here (which I did for some!)
- For a nice change, you can dip the slices in melted chocolate. Combine chocolate and coconut oil in a bowl and heat in 30 second intervals until melted. Dip the peels into the melted chocolate (do not coat them in sugar first!) and place onto parchment paper to firm up.
 Slice the pieces into desired thickness (I want to say my thickness was between ¼ and ½ inch.) Place into a small saucepan.
 Here on the right you can see how thick the syrup has gotten after cooking for 1 hour! That is exactly what you want! On the left, well, this was an error! I accidentally added two cups water and 1 cup sugar!! That's alright, no harm was done. I just drained the pot and added the correct amounts 🙂
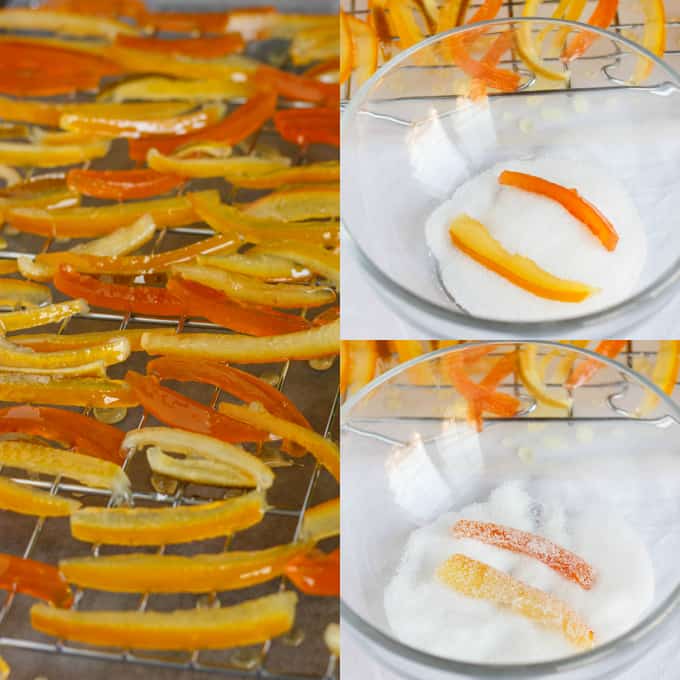 Line a baking sheet with parchment paper for easy clean up. Add a wire rack on top and carefully place the boiled peels onto it. Don't throw away that excess syrup!! Store in the fridge for later use. Allow the peels to sit overnight (you are looking for a good 24 hours of not touching these!)
 For a nice change, you can dip the slices in melted chocolate. Combine chocolate and coconut oil in a bowl and heat in 30 second intervals until melted. Dip the peels into the melted chocolate (do not coat them in sugar first!) and place onto parchment paper to firm up.
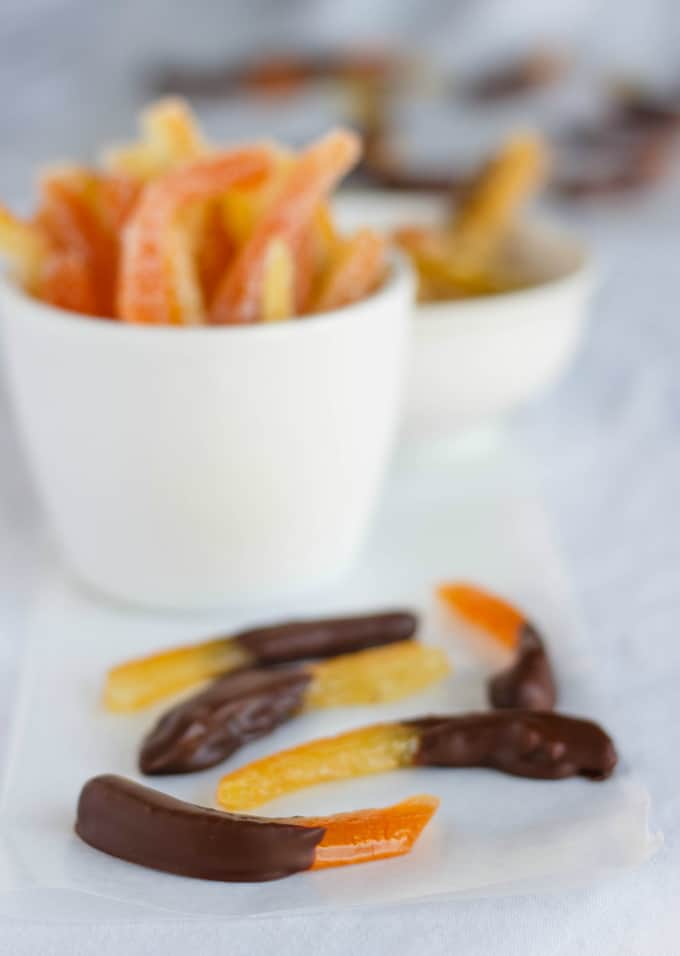
And that is it! They are super easy to make and we were incredibly impressed. You still get a hint of bitterness, but nothing overpowering. Personally, we thought it added character as otherwise these would be a very sweet treat.
Be sure to come back and check out what I have planned for all that extra fruit and syrup!
For more fun and inspirational holiday recipes, check out the holiday dessert category on Ricardo Cuisine!
This is a sponsored post. I was fortunate enough to receive monetary compensation from Ricardo Cuisine. All opinions are my own and I would not recommend a product or recipe that I did not enjoy.
Florian @ContentednessCooking
lovely recipe! Well done. Those look amazing!
Kacey
Thanks, Florian!
Kristine | Kristine's Kitchen
I love making things the homemade way, and this is such a great tutorial! You make these candied citrus peels look SO easy! I can see using these in so many holiday recipes.
Kacey
On top of a cake would be a great idea! And I agree, homemade is the way to go 😉
Krista @ Joyful Healthy Eats
Seriously I am amazed by this post! I always wondered how they did this and I LOVE your step by step photos so helpful! Thanks girl!
Kacey
Thanks, Krista!! I always wanted to know how they were done, too, so glad I could help!
Stephanie
Such a great tutorial, these look so good!
Patricia @ Grab a Plate
You're so right! Every year I see these and want to make them, yet get intimidated! I am thrilled to have your recipe, and so glad for the step-by-step images! This are most definitely on my list for this year (our orange tree will be full soon, too). Thank you!
Kacey
I must say, I am jealous about that orange tree! But happy you can utilize this recipe to its fullest 🙂
Kimberly @ The Daring Gourmet
Gorgeous! There is NO comparison between homemade and store-bought, homemade has such a better, more vibrant flavor!
Kacey
I find your statement so true, Kimberly! When I made homemade baby food I could SEE the colour difference from the store-bought stuff.
Sara
I LOVE candied citrus peels, I have a microwave method I typically use. You've inspired me to make some soon, it's been way too long!!!
Kacey
Ohh, intrigued by this microwave method! Happy to help push you along 🙂
Sabrina @ Dinner, then Dessert
Candied citrus peels are such a unique treat! Thanks for sharing the recipe!
Kacey
Thanks, Sabrina!
Katie @ Recipe for Perfection
I made candied kumquat peels last year- very similar process! Lots of work, but the glittery peels were totally worth it.
Kacey
What a great idea, Katie! Something I would never have thought of!
Anna @ Crunchy Creamy Sweet
I love how amazing the house smells when you make candied citrus peel! So good!
Kacey
Definitely gives off a festive vibe 🙂
Justine | Cooking and Beer
I'm obsessed with recipes like this. Candied citrus is one of my favorite snacks! SOOOO nicely done!
Kacey
I cannot believe I waited so long to give it a try!!
Kimberly @ Bake Love Give
These are gorgeous - can't wait to use them to spice up our holiday baking!
Kacey
They will be picture perfect on a cake 🙂
Des @ Life's Ambrosia
These look like such a great treat!
Caroline Leacman
Where do I find our recipe for the leftover syrup? Thank you Caroline
Kacey
Hey, Caroline! I made a simple fruit salad with it: https://thecookiewriter.com/fresh-fruit-salad-using-leftover-fruit-simple-syrup/
samantha maber
these look so delicious. I want to make them for my sons TWO-ti fruiti party. How long in advance can i make them xxx
Kacey
Samantha, I found they held up really well so you can easily do them in advance (a good three-four days.) I think your theme is adorable!! My daughter did not like the bitterness from the fruit but all the adults did, lol.
sharon Laverentz
Nice presentation! Thanks. I have a question however. In the list of ingredients you wrote 1 1/2 cups of sugar but in the text you said 2 cups. I assume the 2 cups is correct but wanted to check. Also, about how many cups of peeling do I need if I am only doing oranges?
Thanks!!
Kacey
Ah, you are correct! Sorry about that. I think I got mixed up when I was talking about the error I made in the recipe earlier 🙂 2 large oranges should be suffice (when I made the recipe there was a lot of leftover syrup so I could have added some more peels.) If you click on the link to the original recipe on Ricardo, you will see they made the recipe with two large grapefruit so the oranges can be used interchangeably 🙂
Joella renninger
Your recipe was perfect !Was wondering if I can freeze candied orange peel? Please let me know
Kacey
Woohoo! You know what? I have never froze them. But I found this article and it seems like you are good to freeze them 🙂
Thuy
How long will these last outside? Especially the chocolate one?
What's the best way you would recommend to store them for gift?
Kacey
As long as they stay in an air tight container in a cool, dry place, they should last for a while! You can always store them inside a small Tupperware container inside a nice gift box 🙂
Brittney Aweh
From start to finish about how long does this take?
Kacey
Sorry, I am just seeing this now. I would say at least 2 hours, but drying time can vary!
Bri Malaspino
After I strained all the citrus peels out of the sugar, I turned it up a little and made hard candies out of the orange sugar. Very delicious use of the leftovers.
Thanks for the great recipe!