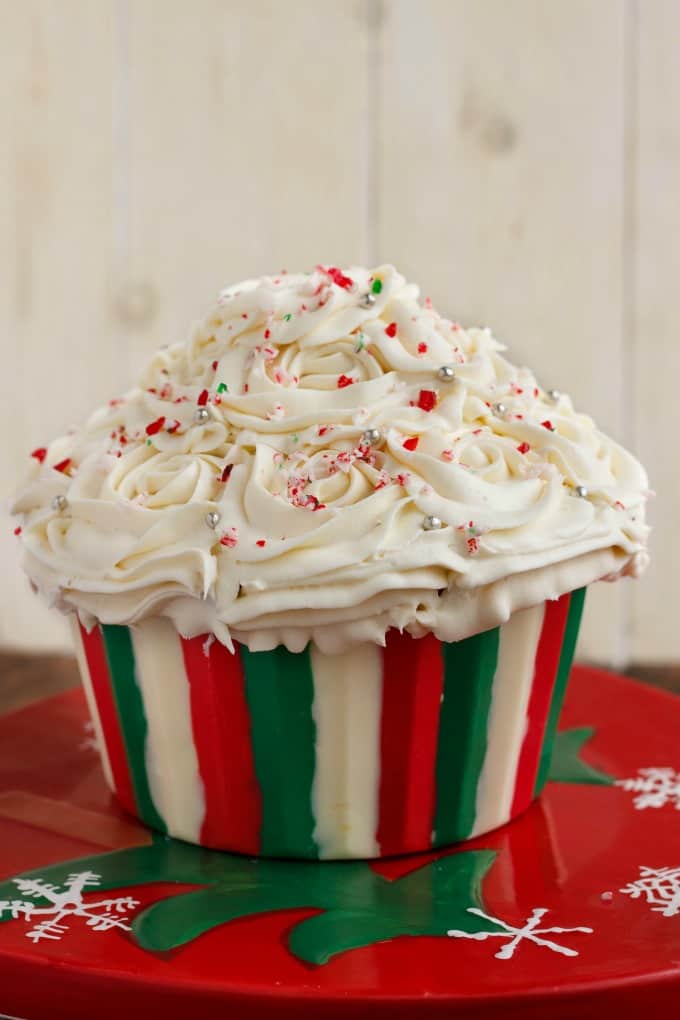
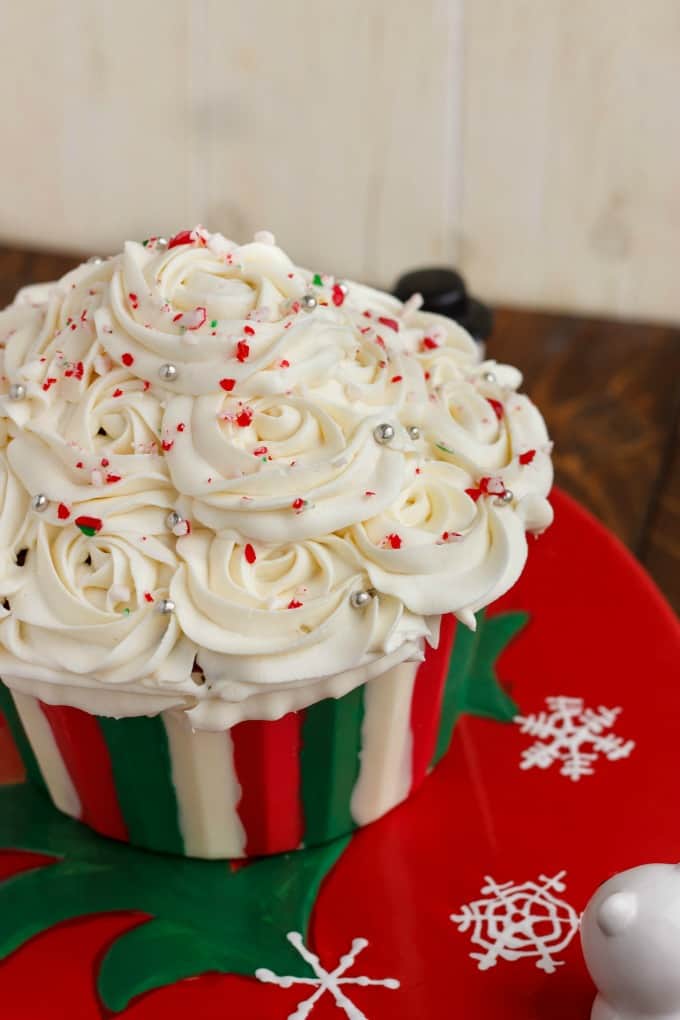
Giant cupcakes are a fun treat any time of the year, but this festive giant cupcake for Christmas is all centered around the most wonderful time of the year!
Oh, boy, is Christmas sneaking up on us!
The weeks are flying by and my schedule seems to be getting busier and busier (not that it is really a complaint, but I do look forward to relaxing on my daughter's Christmas holidays!) I always remark how busy October is for us with all our birthdays and such, but I have come to realize the end of November/December is packed! The only person in my family that seems to have a relatively non-interrupting/stand-out birthday is my sister, who is born in May. Nothing goes on in May (especially blog related) so I am always on top of her birthday dessert! My brother, on the other hand... His birthday being early December really throws me for a loop. Sadly his birthday cake did not turn out at all this year (I am debating about posting pictures of the fail!) but at least my giant cupcake for my family Christmas party turned out somewhat descent!
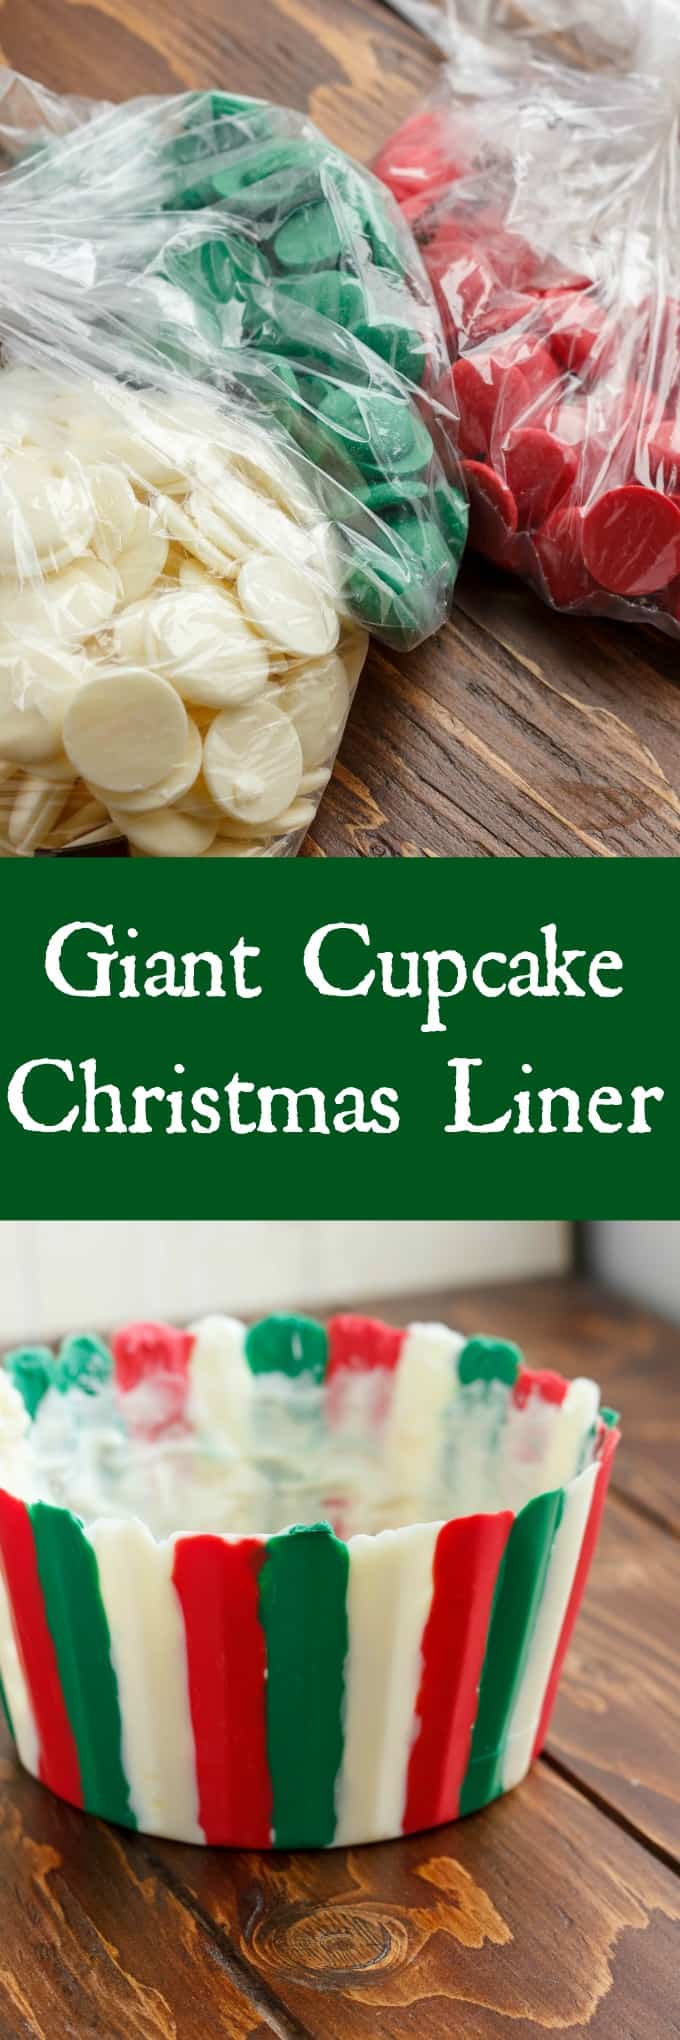
I find the giant cupcake pan is somewhat of a "ohhh, that is so neat, now let me sit it in my pantry for a year," type of tool. I really love it but it does not get used very often! That being said, I knew this year I wanted a giant cupcake for Christmas. Nothing too crazy, but at least something to say I used the pan during the holiday season. My original idea was to make a giant Christmas tree out of the pan, but I see a lot of those on Pinterest (and here I thought I was being original!) Then the new idea hit me as I was browsing the Bulk Barn. They had Christmas-colored candy melts and the immediate thought went to my candy melt liner I made for my giant cupcake years ago.
This is where the festive giant cupcake for Christmas was born!
Now, don't get me wrong, you can color white candy melts yourself, but I believe you have to use a specific food coloring and I did not want to buy extra coloring. It just saves time and effort having them already colored, and we all know how difficult red food coloring can be in food!
📖 Recipe

Festive Giant Cupcake for Christmas
A candy melt liner wraps this giant cupcake for Christmas! You will not believe how easy it all is! Merry Christmas!
Ingredients
- 2 cups all-purpose flour
- ½ cup cake and pastry flour
- 1 ¼ cups granulated sugar
- 1 ¼ tsp. baking soda
- ½ tsp. salt
- 1 tbsp. cocoa powder
- 1 cup melted coconut oil
- 1 ½ cups buttermilk, room temperature
- 2 eggs, room temperature
- 2 tbsp. red food coloring
- 1 tsp. apple cider vinegar
- 1 tsp. vanilla
- Cream Cheese Frosting:
- ½ cup butter, room temperature
- 1 cup cream cheese (one brick), room temperature
- 4 ½ cups confectioners' sugar**
- 1 tsp. vanilla
- Topping:
- Crushed candy cane
- Silver edible balls
- Liner:
- 3 packs or candy melts in desired colors
Instructions
- Preheat oven to 325F.
- Prepare your cake pan by spreading vegetable shortening lightly all around the inside of both cavities (make sure to get up the sides.) Add a tbsp. or two of flour and rotate the pan until the flour has dispersed all over the shortening, gently tapping out any excess flour. If you see any spots that don't appear to be covered, reapply the vegetable shortening and cover with flour.
- In the bowl of a stand mixer, sift in the flours, baking soda, salt, and cocoa powder. Pour in the sugar. Combine, using the paddle attachment. While the mixer is on low, add in the oil, cider vinegar, buttermilk, and eggs (one at a time.)
- Stir in vanilla and food coloring until combined.
- Pour batter into each cavity until they are about half way or ¾ths full.NOTE: Since I am using a non-Wilton pan, I find my cavities hold less.
- Bake for 45 minutes to 1 hour, or until toothpick comes out clean.
- Put hot pan onto cooling rack and allow to cool until you can pick up the pans with your bare hands to flip the cakes out (roughly 20 minutes.)
- When you can flip the cakes out, allow to finish cooling completely on the racks.
- Level off the two layers as you would a traditional cake (make them as flat as possible.)
- Slice the bottom portion in half, horizontally. Spread filling of your choice on top and sandwich the layers back together. I did not touch the top half of the cupcake.
- If you are going to decorate with a candy melt liner, place the bottom half of the cupcake into the liner gently. Spread some buttercream on top and then place the other half of the cupcake on top. Continue to decorate as usual.
- For the liner, melt each color in a different bowl using the microwave (see link in post for step-by-step tutorial.) Using your fingers, spread each color one at a time in between the grooves of the bottom portion of the cupcake pan. Once you have one layer done (do not worry about the very bottom) place into refrigerator to harden. Repeat this 2 or 3 more times until you have a nice, thick liner. Pour excess melts into bottom of liner to seal it altogether.
Nutrition Information:
Yield: 20 Serving Size: 1Amount Per Serving: Calories: 457Total Fat: 23gSaturated Fat: 15gTrans Fat: 0gUnsaturated Fat: 5gCholesterol: 51mgSodium: 288mgCarbohydrates: 60gFiber: 1gSugar: 42gProtein: 5g
I am still not 100% with how this turned out, but overall, it was really easy to make and design! I love pairing cream cheese frosting with red velvet, but it is not a very stable icing and tends to not do well with decorating. The rosettes came out okay, but I definitely needed something more stable. This is a giant cupcake for Christmas, after-all!
On a final note, I find as I work with the giant cupcake pan more often, the more I see issues/concerns. Personally, the one side (the base) takes longer to cook than the top. When I cut off the top of the base, there was still some under-cooked batter in the middle, but the top was perfect. Had I cooked it all longer, the top would become overcooked. I may start baking the pieces separately as the bottom part of the cupcake definitely needs more time.
Faith (An Edible Mosaic)
This is so much fun! I usually go for a Buche de Noel when I want a festive Christmas Cake, but I think I might have to give this pretty cake a try - I know it would be a hit!
Kacey
It sure is a showstopper!
Florian @ContentednessCooking
So festive and delicious! Perfect for your christmas table!
Lora @savoringitaly
What a super fun and colorful Christmas dessert idea! I have to check out your cupcake liner tutorial, my kids would have so much fun making it!
Kacey
And I bet just as much fun eating it 🙂
Gerry @ Foodness Gracious
Whoa, the perfect size for me 🙂
Kacey
Ha! The same thought has crossed my mind!
Katie @ Recipe for Perfection
Eeek! This is crazy cool. I love the jumbo cupcake look, and I definitely wasn't expecting that the "wrapper" would be made of candy. Bravo!
Kacey
Katie, the edible candy liner makes it! I wonder if I could make some for regular-sized cupcakes...
Chandra@The Plaid & Paisley Kitchen
Oh my Gosh! I have that pan and I have never used it! I think using the already colored candy melts is a much better way to go than making your own colors! Red coloring is a total pain just like you wrote. This is an adorable cake I love it!
Kacey
It is definitely a once a year pan, lol. Red colouring is sooooo hard to work with! I usually add cocoa powder to help but I don't think that would work with candy melts.
Melanie | Melanie Makes
WOW! Love the liner that you created and of course, the ginormous size of this cupcake!
Kacey
Thanks, Melanie!
Amy
Great for family get togethers!
Erin @ Dinners, Dishes, and Desserts
What a fun idea! So pretty and festive, it coulbe the centerpiece of the table!
Sabrina @ Dinner, then Dessert
This looks like a great decoration for a Christmas party that would be almost too pretty to eat! Thanks for sharing!
Sara
This is just awesome, what a fun and creative cake! I need to buy one of these pans 🙂
Kacey
They are lots of fun, Sara!
Nutmeg Nanny
Oh my goodness what an amazing looking dessert! This is a total showstopper 🙂
Cookin Canuck
I can't believe how quickly December is flying by! Your giant cupcake is such a great idea for the holidays!