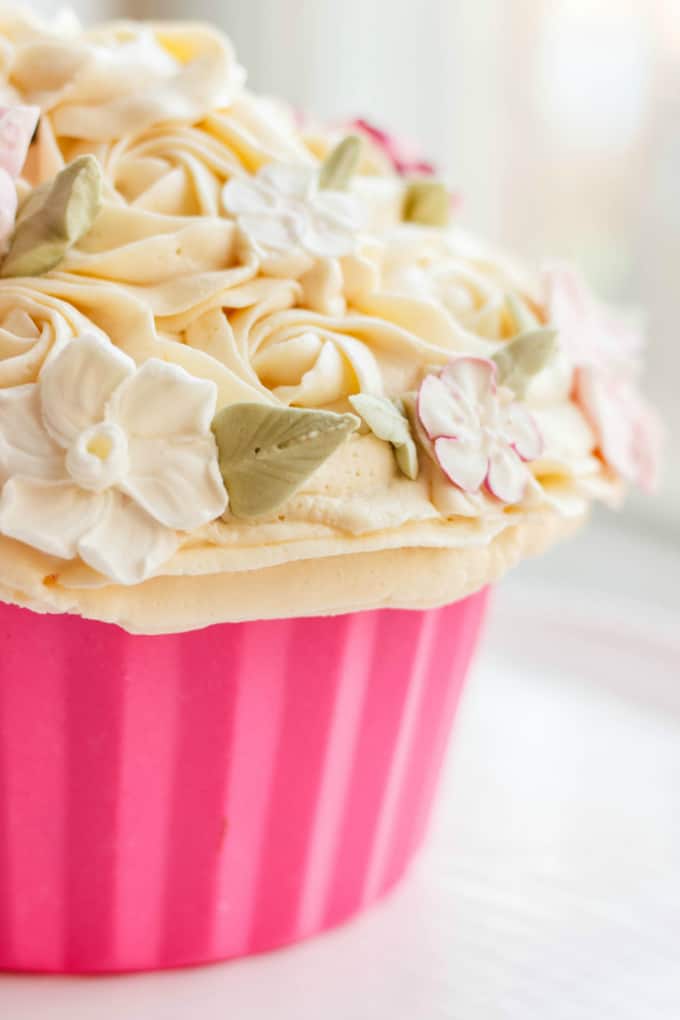
After this tutorial, you are going to say to yourself "why didn't I think of that?!" I cannot take credit at all, but whoever did come up with this idea, you are awesome! No more decorating with buttercream or rolling out a little piece of fondant. We are left with a smooth, perfect cupcake liner without any trouble at all!
I spoke briefly before about my first experience working with the giant cupcake pan. My neighbor had wanted to make a giant cupcake for her husband and after we had allowed it to finish cooling, we had no idea how to decorate it. In the end we iced the entire cupcake, but it was lacking pizzazz at the bottom (it didn't have the cupcake liner feel.) That was over a year ago now and how times have changed!

I have to thank Pinterest for this find. It was a fluke to stumble upon it. Once I understood exactly what it was, I began ferociously searching "giant cupcake liner" and "giant cupcake designs." You will note that 90% of the giant cupcakes use this candy melt liner. I have also seen chocolate liners (and attempted one, more on that later), but they are more common with the silicone cupcake pans as opposed to the big metal ones.
Now, I know what you are thinking. Is it really that easy? If it was, wouldn't I have thought about it? It is true, the task is super easy! I never thought about it personally because I have never worked with candy melts. But after my first attempt, I knew this was a foolproof technique. In this tutorial, I will show you how to create the giant cupcake liner using candy melts. *I did not use Wilton's candy melts. Nowhere near me carries these bags, however, Bulk Barn carries Merckens molding wafers, and they worked perfectly! As with any candy decorating materials, wait for sales or buy in bulk. Next time I see Michaels having a sale on candy melts, I am going to pick up a few bags because at regular price, they are quite expensive.
Giant Cupcake Liner
Makes 1 liner
Half a bag of candy melts OR about ¾ cup Merckens molding wafers
Microwavable safe measuring cup
Silicone pastry brush
Spatula
Giant Cupcake pan

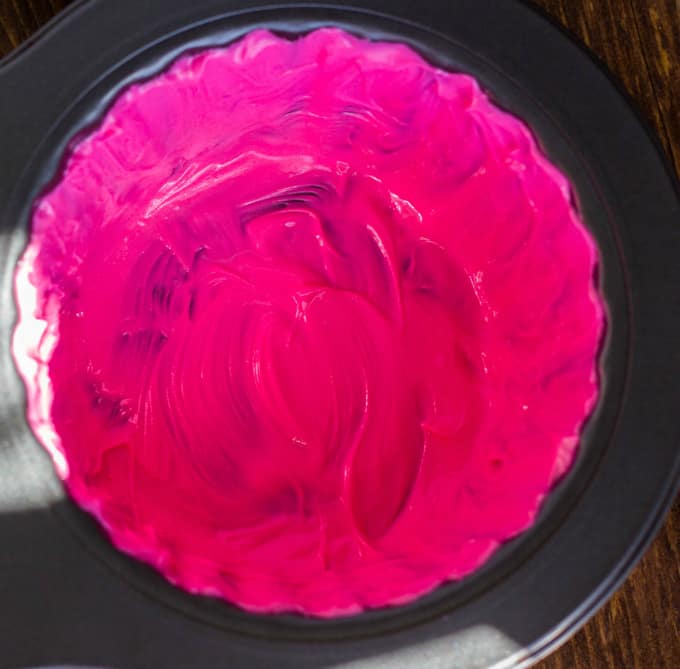
1) Pour the candy melts into your measuring cup. Microwave in 30 second intervals, stirring between each set, until the candy is melted. You want to end up with about ½ cup of melted candy melts. Worse comes to worse, we can melt more.

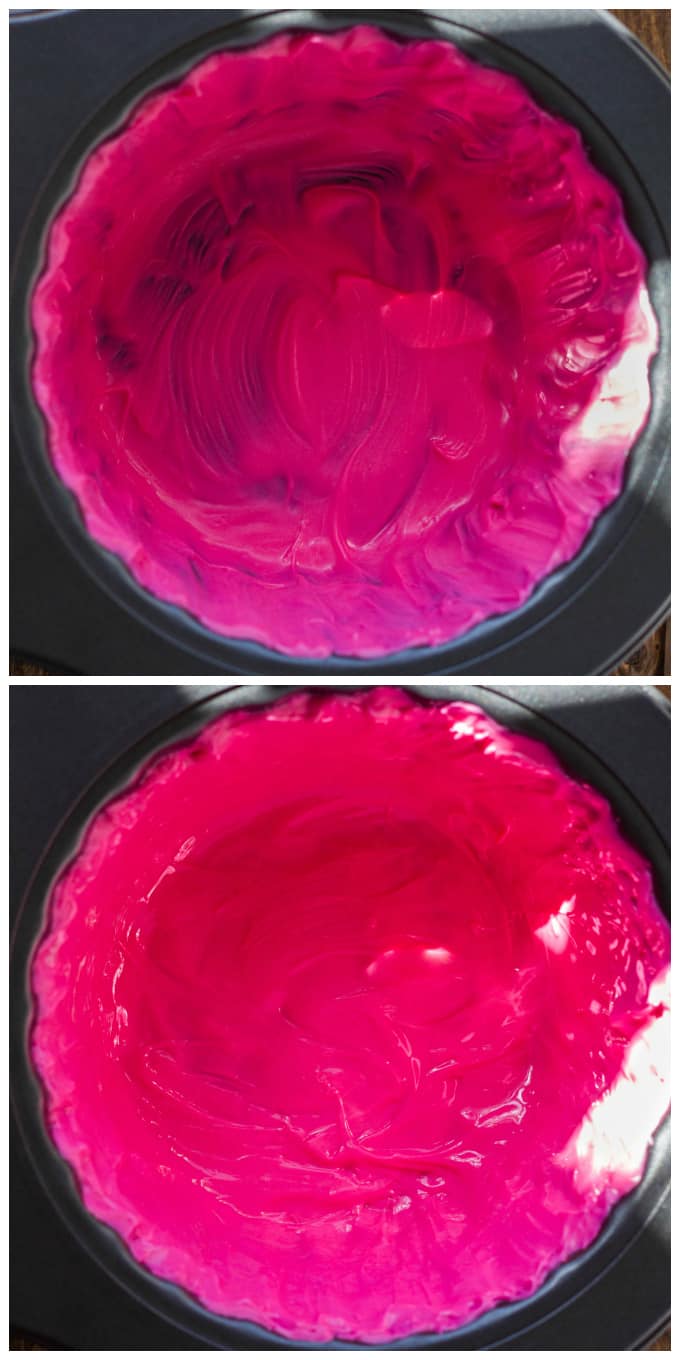
2) Pour about half of the melted candy into the bottom liner of the cupcake pan. Using a pastry brush, brush the candy up the sides, making sure to get into every little crevice. Make sure to go right to the edge of the pan, trying to remain neat (but don't worry too much.) Place the pan into the fridge for 10-20 minutes, depending on how thick you made the first coat. Longer wait time is better.

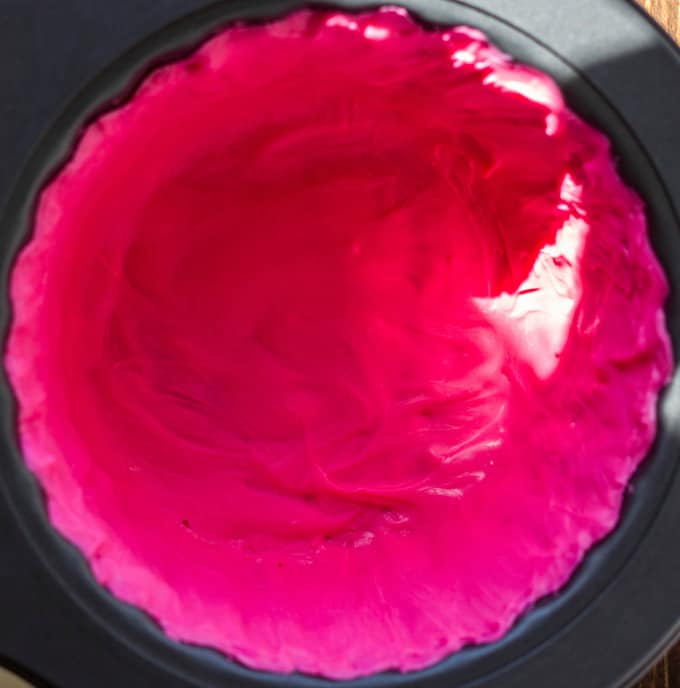
3) When the first layer has hardened up, pour the rest of the mixture into the pan and once again paint up the sides, ensuring even coverage. When complete, pop it into the fridge one more time and wait for it to harden completely (20-30 minutes, just to be safe.)

4) Remove the pan form the fridge and gently tilt the pan and using your fingers, pull the candy melt liner out of its mold. It should be thick enough where it does not break. I know it will be nerve racking but trust me, the worse that can happen is that it will break and you will have to melt the candy again.

5) Place the liner down gently and marvel at your creation!!
Tips:
It will probably be best if you cut the bottom half of your cupcake in half and put each half in separately. Too much at once might cause the liner to crack.
You will need to trim the cake down before placing it into the liner. No worries, you now have some extra cake to snack on!
Don't worry too much about the top edging of the cupcake liner; when you place the top half of the cupcake onto the bottom piece, it will cover the rough edges.
Did your cupcake liner crack or break when you removed it? It might have been too thin. Melt the candy down and start over. No big deal, it happens. I actually cracked the liner in the truck when delivering the cake to my little cousin.
Wilton's candy melts come in a variety of colors. The Merckens had less colors to choose from but you can always buy plain white and use food coloring. I chose pink because I knew it was the birthday girl's favorite color and it saved me from having to add food coloring.
And there you have it! Now, I have seen people use chocolate to make the liners, but it is really hard to remove. If using the silicone cupcake pan, you could peel the sides of the pan away from the chocolate, leaving a perfect shell. I tried white chocolate in my metal pan, regular chocolate, and finally, chocolate with coconut oil in it. I could remove none of them. HOWEVER, I was trying to tap the liners out. I think the chocolate and coconut oil one would work if I had tried removing it properly. I am going to give it another shot in the future.
📖 Recipe

Giant Cupcake Liner Tutorial
How to make a smooth, seamless liner for your giant cupcake cakes!
Ingredients
- Half a bag of candy melts OR about ¾ cup Merckens molding wafers
- Microwavable safe measuring cup
- Silicone pastry brush
- Spatula
- Giant Cupcake pan
Instructions
- Pour the candy melts into your measuring cup. Microwave in 30 second intervals, stirring between each set, until the candy is melted. You want to end up with about ½ cup of melted candy melts. Worse comes to worse, we can melt more.
- Pour about half of the melted candy into the bottom liner of the cupcake pan. Using a pastry brush, brush the candy up the sides, making sure to get into every little crevice. Make sure to go right to the edge of the pan, trying to remain neat (but don't worry too much.) Place the pan into the fridge for 10-20 minutes, depending on how thick you made the first coat. Longer wait time is better.
- When the first layer has hardened up, pour the rest of the mixture into the pan and once again paint up the sides, ensuring even coverage. When complete, pop it into the fridge one more time and wait for it to harden completely (20-30 minutes, just to be safe.)
- Remove the pan form the fridge and gently tilt the pan and using your fingers, pull the candy melt liner out of its mold. It should be thick enough where it does not break. I know it will be nerve racking but trust me, the worse that can happen is that it will break and you will have to melt the candy again.
- Place the liner down gently and marvel at your creation!!
Nutrition Information:
Yield: 1 Serving Size: 1Amount Per Serving: Calories: 878Total Fat: 41gSaturated Fat: 17gTrans Fat: 1gUnsaturated Fat: 20gCholesterol: 60mgSodium: 791mgCarbohydrates: 120gFiber: 4gSugar: 63gProtein: 11g

Alison's Wonderland Recipes
This is crazy clever!
Kacey
I can't take full credit, but once I saw it I couldn't help but say "why didn't I think of that?"
Robert
I had the same trouble with regular chocolate not being able to unmold. With the candy melts is it better to add a tiny bit of veg oil to help it unmold better when its set? Or does it unmold fine on its own?
Kacey
No veg oil needed. The candy melts unmold perfectly from the pan. I am going to try working with chocolate again but the candy melts are sure to work!
Mary
Hi! When you mention trimming the cake down to make it fit, do you mean like cut off a thin layer from all around the base? How do you this? Does a simple bread knife work?
Kacey
Exactly what you said. I used a bread knife to do it. Even if it is a bit rough, you are going to cover it in buttercream and/or the cupcake liner. I just found the cupcake itself was a bit too big to fit into the liner without trimming it.
Jenn
Genius!!! Mine turned out beautifully. One thing to note, make sure to use oil based dyes if you want to make a different color. I used a gel based product and it turned into a hard grainy mess. I tried again and it is simply gorgeous and the easiest thing to make!
Kacey
Thank you, Jenn, you are absolutely correct with the food colouring! I used candy melts that came pre-coloured, but I know my neighbour bought specific food colouring to transform her melts.
Esil
Looks fab, just wondering about how the finished cupcake cuts for serving?
Kacey
Funny thing is, I have never cut into one! I'll get around to making more and promise to cut into one 🙂
Dana
I have read to warm up a knife under warm water to get a easy slice without chocolate breaking
Kacey
That will definitely help. My Aunt cut my Christmas cake and the chocolate held up quite well without any fancy techniques.
Teresa
I have been trying to find information on long as well as how best to store the molded liner before use?
Kacey
I always use mine right away but I cannot see these molds going bad any time soon (they are made with candy melts which are sugar.) As for storing, I don't see refrigeration necessary as once again, the melts are stored at room temperature to begin with. If you want to be safe, you can cover and place into your refrigerator, but leaving it covered on the counter should be just as fine.
Carla Reddick
I just tried this. It does not work without having some kind of release agent on the pan. The chocolate stuck fast and it all broke apart.
Kacey
I am sorry to hear that. The tutorial is specifically for candy melts, not chocolate. I have tried chocolate before and have had the same issues (though some people have luck using the silicone pan and chocolate.)
Nicole
Thank you SO much for such an awesome tutorial! I tried it first time and voila it turned out better than I expected!! Came out super easy (and I was nervous about that)......kind of a late question as I am making this cake right now but once the giant cupcake cake is fully made how long can it be stored? It is thursday and I am making it now but will not be used until Saturday afternoon, will it hold okay without any cracking?? (hope so 😉 )
Kacey
I was nervous the first time, too! Worse comes to worse, you just heat the melts again and start over 🙂 As for how long it will hold, the candy melts don't go bad any time soon. I have not made mine too far in advance so I cannot give a definite answer but I don't see it cracking as long as you are not moving it too often (I really hope it holds up!)
Nicole
Thank you so much for the quick reply 🙂 I will give feedback on it, I assume it should be okay but thankfully its for my daughter and not a customer!
Nicole
I fully completed my giant cupcake on Thursday evening and did not use it until Saturday afternoon. The chocolate she'll held perfectly! Cannot figure out how to post a picture otherwise I would!
Kacey
Woohoo! So happy it turned out, Nicole! If you like, you can personally email a photo and I can post it (or perhaps after my blog remodel on the 15-17, there will be an ability to post pictures here in the comments!)
Anne H.
Ooooh! I was looking for something like this because a friend of mine wants a giant cupcake for his birthday! Quick question, I noticed your pan was metal, I think it was at least, mine is silicone, will it with just fine or well it's rubberyness make it harder to remove without breaking?
Kacey
I have seen tutorials using the silicone liner and it actually looks like people have more success with those! Chocolate even works in those ones (where I have yet to get it to work in the metal pan.)
Tami
I just made this liner and in a new Giant Cupcake pan with candy melts and I cannot remove it from the pan. It won't budge. Any tips.
Kacey
You may just have to pull harder. I thought I was going to break it but when I gave it a good tug, it released from the sides of the pan. My only other idea would be trying to heat up the pan in some hot water until it loosens a bit (but it may melt the candy melts too much.) Sorry you are struggling!
Ellie
Hello! Just wondering for those who have made the shell in advance...did you store in refrigerator? On the counter? Thanks!
Kacey
Hey, Ellie. While I have not made the shell in advanced (plan to in the next few weeks actually!) but I think counter top would be fine since the candy melts are found in the store at room temperature and we are not adding ingredients to them.
Hunter's mom
Would cutting up the base and the top into multiple layers to fill with icing be silly? I'm thinking of serving, the top would be a "tier" and the base would be its own tier. Otherwise it seems like too much cake if given one slice from top to bottom. Just looking for ideas.
Kacey
Nope, I totally can see that working! The icing may make the bottom portion taller so just a heads up when it comes to the liner. When we served the cake this Christmas (I finally got around to actually cutting one!) we served the top layer first, followed by the bottom layer. Otherwise I would think it would be too much for one slice.
Deena
Could you coat the outside of the pan with the candy melts to eliminate cutting the cake to fit?
Kacey
I cannot believe I never thought of that idea... I so need to try this!
Deena
Let's do it!
Kacey
I had planned to make an Easter cake this month using this pan, but was going to for-go the liner. I may have to change my plans!
Tabitha
That's just what I was thinking. Did you try it? Did it work out? Any tips?
mommalala
This sounded fantastic because I am struggling with the inside getting it to stay up the sides. But thinking on it wouldn't it turn out a little bumpy and uneven? The inside would be perfectly smooth but the outside would be uneven and that's the part that matters most!
Kacey
I am not sure I am following. Recently I made a liner for Christmas and while there were some imperfections (https://thecookiewriter.com/festive-giant-cupcake-for-christmas/) they are not overly noticeable. You can see in the one photo where there was a little layer problem (one area was thicker so it almost looks like crack lines) but otherwise, it should be coming out smooth.
mommalala
Oh no this was in reference to doing the outside of the pan instead of the inside. Doing the inside of the pan like you do, the outside of the shell would be perfectly smooth. I meant if someone were to coat the outside of the pan instead then the inside of the shell would be smooth but the outside would be uneven. If that makes sense lol
Kacey
Ohhh, that totally makes sense, haha. When I was thinking of it the normal way I was so confused 🙂 Yeah, maybe stick with the inside. I have had no issues 🙂
Douglas Hansen
advice on what we are doing wrong would be greatly appreciated.
Kacey
I am not sure. It is hard to tell when I am not there 😉 Make sure you are using candy melts and NOT chocolate! It makes a difference.
MommaLala
I am making my sons first birthday smash cake from the giant cupcake pan and when I decorated the practice cake it was just so blah looking. I couldn't put my finger on it but the base looked bland. Searched designs and came across this. This could be EXACTLY the fix I am looking for! We are doing a red icing so I'm thinking black or white mold? Will definitely give this a try! Thanks!
Kacey
I am excited for your cake! Give it a practice shot since others seem to be struggling (I have never had a problem and I have used both Wilton's Candy Melts and generic store ones.) Also, find pre-coloured candy melts if you can (they require special food colouring otherwise!) Someone also suggested doing the liner on the outside of the pan so you don't have to trim any of the cake down (never tried it though!)
mommalala
Well I am struggling 🙁 I coat the entire inside..it looks great..stick it in the fridge..and when I pull it out it all slid down the sides and hardened at the bottom! So the second layer I try again and it still keeps sliding down. Any tips? I've got 3 days to figure this out! :-/
Kelly
I think the trick, mommalala, is to paint a very thin layer for the first coat. Then apply two thicker coats.
Deb seitz
I tried this with Wilton candy melts. It would not come out of the pan. I tried to remove it for a long time. What am I doing wrong. Should it go in the fridge between layers? Some say yes some say no. Can it be left in the pan for a long time after the final coating or is there a limit on time?
Kacey
Hi Deb. Sorry it didn't work out! I put mine in the fridge between layers (but to be honest, I use a different brand of candy melts.) Never had any trouble, but I'll purchase some Wilton melts soon to revisit this. I've made many of these liners with no issue so I definitely want to find out what is going on for you 🙂
Kiesh
I read some people are using a metal or siloicon pan to mold the candy. I know this is probably a silly question. LOL! But from my understanding, Is everyone still using the Giant cupcake pan that they baked the cupcake in, to mold the candy inside the fridge? Or are you guy's using a completely different metal or silcon pan to mold the candy? Thanks in advance!
Kacey
Not a silly question! I use the same pan! So I'll make the candy liner in advance, and then bake the cake another day 🙂 Since the two layers are so different in size, I do recommend baking the top and bottom parts separately (so add the batter to the cupcake top first, bake, cool, remove, and then do the bottom portion.) It is just because they do not tend to bake evenly (something I have definitely noticed over time!)
Rose.
My question is for the frosting. What color is the frosting? It's very pretty. Also, do you have a tutorial for how you frosted it? Thank you.
Kacey
Hi Rose! Thank you so much! The icing colour is the result of me whipping up a standard batch of American vanilla buttercream (the vanilla gives it the ivory/off-white colour.) I don't have a tutorial on how I decorated it, but I used a Wilton 1M tip to make rosettes (there are A LOT of tutorials on Pinterest if that helps!) I hope to come back to this one day with new photos and then I can make a step-by-step video 🙂
Carrie
I love the look of this. Is there a specific American Vanilla Buttercream recipe that you prefer?
Kacey
Thank you! I prefer this one: https://thecookiewriter.com/red-velvet-cake-vanilla-buttercream-rosettes/ 🙂
Steph
Has anyone tried just pouring melted chocolate or candy melts directly over the bottom half of the cake (turned upside down); it seems easier but would it look too rough and not smooth maybe?
Kacey
I have never thought of that! Modeling chocolate would probably work here!
Emily B
Worked perfectly, thanks! I can't believe it just popped right out of the cake pan. I was worried I'd be picking bits out and cursing, but it came out without any effort whatsoever.
Kacey
Haha, that is why I am here to test things first! Because trust me, there have been many fails!