• Skip to primary navigation
  • Skip to main content
  • Skip to primary sidebar
The Cookie Writer
menu icon
go to homepage
  • Recipes
  • Cookies
  • Appetizers
  • Drink
  • Desserts
  • Main Course
  • Sauce
search icon
Homepage link
  • Recipes
  • Cookies
  • Appetizers
  • Drink
  • Desserts
  • Main Course
  • Sauce
×
Home » Recipes » DIY

Stairway Remodel Part 1: Ripping out Old Carpet and finding Pressboard/Plywood

Last Updated: Apr 4, 2022 by Kacey · This post may contain affiliate links · 1 Comment

Sharing is caring!

173 shares
  • Facebook
  • Twitter
Wooden stairway with sign

I don't know about you, but when we were out hunting for our first house we saw a lot of interesting things. Keep in mind that every house we looked at was over 5 years old; no new build houses. However, we walked into one house and they had no flooring... the stairs were bare, dust was everywhere. We asked what their plans were for the floor (because hey! If they are fixing problems, I am all for it.) Well, they told us that when we moved in we could choose to put in whatever we like. Yeah, no thank you. I mean, it was a neat idea if you could afford to add that major expensive to your first home budget, but we wanted a substantial down payment and we were only 20 and 24 (I was still at University!) Other houses included outdated everything, incomplete rooms, really poorly taken care of homes. If we were at the point in our lives that we are today, these houses would have been great for the DIYer, but we did not have the experience and wanted a ready-to-move-in home.
 
     Then we stumbled across this guy! My real estate agent noticed it had just gone on the market and figured we could swing by to take a look. Low and behold, they were having an open house later that day so my agent knocked on the door and asked if it was okay if we took a look around right now since we happened to be around the neighborhood. The owners were happy to oblige! We went through the raised bungalow and fell in love. I mean, it was freshly painted, all floors were completed and it was basically move your stuff in and go on with your life! Now, of course, not everything is perfect. Over the years I have come to realize how dated some rooms are (I am looking at you oak spindles!) Now that we have time, money, and experience (haha, okay more or less we are willing to build up our experience) we can get onto tackling some of these major projects!
 
Stairway with railings
Hello ugly oak and carpet.
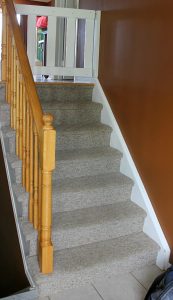
     When you walk through our front door, this is your first sight. I had painted the walls Florence Brown by Behr maybe a year or two after we moved in. I love the color but the oak does not match and overall I just did not care for the carpet. After a couple of years in the house and accumulating various animals (hello Rex and Kitty Rex) you could visibly see the wear on the carpets.
     Plus, cleaning them was a pain with my big vacuum. After many hours on Pinterest, I found some awesome tutorials and stair remodels. I showed them to Mr. TCW but his major concern was us ripping up the carpet and not finding hardwood underneath. We lifted an edge of carpet to peak underneath and we were pretty sure we did not have hardwood. So sad 🙁
 
Stairway with carpet
(Sorry for dusty walls, I started sanding my spindles!)
     Then the craziest thing happened. I was looking online for stair tread and riser kits and low and behold, Lowes had their kits on sale! Surprisingly, Mr. TCW was all for it! He was as sick of the carpet as I was and we knew that without real hardwood underneath, we would have to compensate with buying new material. 36" x 10-½" Unfinished Oak Interior Stair Tread and 42" x 10-½" Unfinished Oak Interior Stair Tread are the two sizes the kits come in so we ordered seven of the 36 inch and six of the 42 inch after measuring both sets of stairs and determining the crazy size differences. Now, while this project still endured a total DIY theme, the cost was much more than it would have been if we had real hardwood underneath (I believe the kits cost around $300 total, not including stain.) However, this post, and the ones to come, will show people how they can achieve a brand new staircase even if they happen to rip up their carpet and find pressboard and plywood.
 
     So... Where to begin?
     1) Prepare yourself. This is going to be a lot of work. It will probably take a couple of weekends, and if you have kids, add in even more time.
     2) Pick out stain colors, paint, sanding tools (paper and blocks) and gathering the right tools.
     3) MESS. I cannot stress this enough! Replacing stair treads starts with tearing out carpet, then staples, and then cutting the old bullnoses. All this is done inside your house so just imagine where all the dust is going to go. On your picture frames, across the floor. Heck, you will be finding it everywhere for the weeks to come.
     4) Buy your material and go over it with a fine-tooth comb. When I was sanding my treads I came across one piece that had a crack right through it. Thankfully, Lowes had no problems exchanging it but our closest Lowes is 20 minutes away one way, so it was an extra trip we shouldn't have made.
     5) If you have kids/animals, this would be the time to utilize a good babysitter. We dropped off girlie for the day and then would pick her up after dinner.
     6) Get some extra help if you do not feel comfortable. We managed by ourselves but some projects require heavy lifting or electrical where I am of no help!
 
Supplies (for this chapter):
Circular saw
Dremel
Dust mask
Protective eye wear
Heavy duty gloves
Pliers
Pry bar
X-Acto knife
Vacuum (Shop-Vac)
 
Terms:
Treads- This is the part you step on.
Risers- This is the back portion of the step where your stair tread sits up against (and your next step sits on top of.)
Bullnose- The edge of your stairs that is slightly rounded and hangs out about half an inch more than the rest of your stair tread.
 
Begin!
 *Note: this is how we went about it. Everyone has their ways and do not feel obligated to follow my directions. There are things I would have done differently and I will try and note them when applicable.
 
Stairway with carpet
     Take some before pictures. I did not grab many but you can see the ones going upstairs, and the ones going downstairs. The ones leading upstairs definitely had more wear but I was not going to transform one set and leave the other.
     Start ripping up the carpet! Now, a couple of pointers. Our spindles are attached directly to our treads so that means the carpet was wrapped around these spindles. For safety reasons (aka our child) we could not remove the spindles at this time so it was a lot of extra work on Mr. TCW's part to pull the carpet up. If you can, remove any obstacles on your carpet if needed. You will do lots of pulling and slicing to get the carpet off. Work in sections, about two steps at a time so you are not left pulling on a huge mound of carpet!
     Once the carpet is removed, you might be thinking, "wow, what have I gotten myself into!" If you don't have hardwood, you might start having doubts. None the less, press forward! Remove all staples with pliers (there will be millions, TRUST me), carpet tack and glue. Even though we are replacing the stair treads and risers, you still need a flat, clean surface to work with.
 

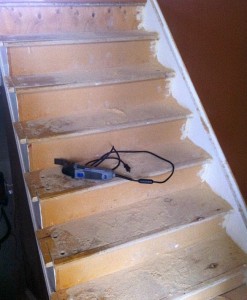
Get that vacuum out and suck up the mess you have created. We collected most of the staples but you never know what you missed. Our Shop-Vac came in handy during this renovation.

 
Wooden strairway

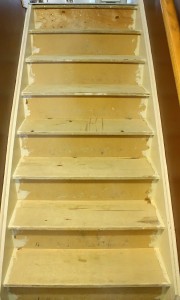
Step one= complete! We could just leave it at this and go on our merry way. Or we can get out our power tools and sever off the bullnoses on our stairs! This is where the dirtiness factor comes into play. What would I do differently here? I would recommend sectioning off this portion of your house. Unfortunately, how my house is designed it would be very hard to do this but I think even if I had attempted a bit to keep the dust contained I would not end up with sawdust EVERYWHERE. EVERYWHERE.

 
Stairway with drill

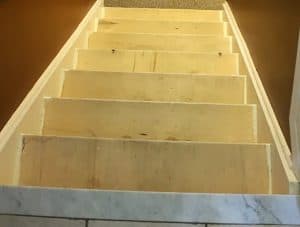
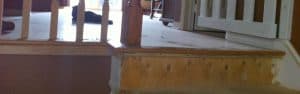
See the picture below? My entire upstairs floor is coated in a fine layer of dust! You can see where Kitty Rex walked through it! I was shocked! And if it is all over the floor, you know my walls, pictures, counters, etc. are also covered in it! Arg, that was definitely the worst part! We cut the bullnoses off with a circular saw and touched up any details with our dremel. You want the treads flush with the risers. It was quite simple after Mr. TCW had made the straight line to cut off the bullnoses but our fire alarms sure did not like the dust. We turned them off until we were finished cutting and remembered to clean out any of the dust in them. Cutting was simple but did take some time! Thankfully we only have 13 steps in general.

 
Stairway with railings
     This concludes part one. You are safe to walk on the stairs, just be careful. We left them overnight because by the time we got the carpet off, staples removed and bullnoses cut, it was well into the evening. This is a very time consuming project but well worth it in the end!
     ->Next post will feature sanding spindles, staining treads and rails.
Stairway Remodel Part 2: Sanding and Staining Stair Treads and Rails
Stairway Remodel Part 3: Installing New Stair Treads and Risers
Stairway Remodel Part 4: Painting Spindles, Risers, and Using Polyurethane
« Cucumber Salad with Fresh Dill and Red Onion
Stairway Remodel Part 2: Sanding and Staining Stair Treads and Rails »

Sharing is caring!

173 shares
  • Facebook
  • Twitter

Reader Interactions

Comments

  1. James D

    September 08, 2018 at 9:46 pm

    Beautiful work Kacey, thanks for sharing!

    Reply

Leave a Reply Cancel reply

Your email address will not be published. Required fields are marked *

Primary Sidebar

  • Instagram
  • Pinterest
Kacey preparing a salad in the kitchen

Hi, I'm Kacey I've started this blog 10 years ago and developed hundreds of recipes. Check out my full bio and story below.

More about me →

Popular

  • Crispy deep fried breaded mushrooms
    Crispy Deep-Fried Breaded Mushrooms
  • Montanas antojitos in white bowl
    Montana's Antojitos Recipe
  • Fruit kabobs on white plate with almind milk cream in glass
    Fruit Kabobs with Almond Milk Whipped Cream
  • Cream of mushrrom soup potatoes in blue baking pot with spoon and on white plates
    Cream of Mushroom Soup Potatoes

Recent Recipes

  • Four delicious sweet breakfasts.
    37 Sweet Breakfast Ideas (Insanely Delicious)
  • Four scrumptious russet potato dishes.
    35 Scrumptious Russet Potato Recipes You Will Love
  • Four delicious scallops dishes.
    31 Scallops Recipes for an Unforgettable Main Course
  • Four delicious cauliflower dishes,
    27 Healthy Cauliflower Recipes You Should Do Today

Important Pages

Privacy Policy

About Me

Contact Me

Recipe Index

Kacey preparing a salad in the kitchen

Hi, I'm Kacey I've started this blog 10 years ago and developed hundreds of recipes. Check out my full bio and story below.

More about me →

Popular

  • Crispy deep fried breaded mushrooms
    Crispy Deep-Fried Breaded Mushrooms
  • Montanas antojitos in white bowl
    Montana's Antojitos Recipe
  • Fruit kabobs on white plate with almind milk cream in glass
    Fruit Kabobs with Almond Milk Whipped Cream
  • Cream of mushrrom soup potatoes in blue baking pot with spoon and on white plates
    Cream of Mushroom Soup Potatoes

Recent Recipes

  • Four delicious meals with green beans.
    37 Healthy Green Bean Recipes That Are Insanely Delicious
  • Four scrumptious sweet breads.
    29 Sweet Bread Recipes You'll Want to Make Every Day
  • Four scrumptious sweet pepper dishes.
    29 Sweet Pepper Recipes You'll Simply Love (Easy & Quick)
  • Home friens in black pan with wooden spatula, fork held by hand
    Vegetarian Home Fries (using Fingerling Potatoes!)

Important Pages

Privacy Policy

About Me

Contact Me

Recipe Index

The Cookie Writer LLC | Copyright © 2025